


Hello! This is the long lost Princess. I haven't posted in a while and am not sure when I'll be feeling up to posting again. I have a severely strained shoulder muscle. :( I'm still not sure how I did it, but alas my days are filled with anti inflammatory medication, muscle relaxers and physical therapy... and lots of pain. In the mean time, I'm working on lots of fun, cool baking ideas that I will get back to (and posted) as soon as possible.
On a positive note, I entered a Betty Crocker contest called "Bake A Difference" And guess what??? I won the chance to go for the grand prize! I would appreciate all of your votes to help me win! That would be so awesome! Here is a link: http://apps.facebook.com/BakeTheChange/winning You can vote for me (Aaron Williams aka The Princess) up to five times each day. I really hope that I win and can get this program started in my community very soon, even if I don't win. Thanks in advance for your support and I'll get back to baking and posting as soon as I can! Bake a difference today... Vote for me!!!! :)
Thursday, September 30, 2010
Wednesday, September 22, 2010
Peanut Butter Cup Cookies
I know! The name of this recipe just SOUNDS yummy! Wait till you see the finished cookies! I found this recipe on allrecipes.com I love this website because not only are they recipes that people actually use, but they are reviewed by other users. The reviews give you advice and opinions, and while sometimes they aggravate me (like when someone doesn't follow the steps in the recipe and then complains that is didn't turn out correctly), I also find them very helpful. Not to mention, they have recipes for EVERYTHING... and you can add recipes you like to your "recipe box" while you are browsing. Seriously, check it out. You will love it. On to the current baked deliciousness...


INGREDIENTS:
1 3/4 cups all-purpose flour
1/2 teaspoon salt
1 teaspoon baking soda
1/2 cup butter, softened
1/2 cup white sugar
1/2 cup peanut butter
1/2 cup packed brown sugar
1 egg, beaten
1 teaspoon vanilla extract
2 tablespoons milk
40 miniature chocolate covered peanut
butter cups, unwrapped
For once, I didn't change any ingredients... oh wait, yes I did, but we will get to that in just a bit. First preheat your oven to 375. Whisk together the flour, salt and baking soda; set aside.

Cream together the butter, sugar, peanut butter and brown sugar until fluffy. Like this...

It's so peanut buttery! It smells amazing already. Beat in the egg, vanilla and milk...

Isn't it amazing what one little egg can do to the texture of your batter? So smooth and creamy! Get a spoon and just eat the dough. Now. Oh wait, you can't do that! There is raw egg in there after all. So resist the urge to gobble it up. Gradually add the flour mixture; mix well...

Here is what the dough looks like when you get it all mixed up...

The recipe says shape into 40 balls and place each into an ungreased mini muffin pan. I decided not to roll it into balls... I just used my trusty small scoop and scooped it right into the mini muffin pan. Worked like a charm... and I ended up with more cookies! I ended up with 52.


Bake at 375 degrees for about 8 minutes. While they were in the oven, I unwrapped my reese cups...


Remove from oven and immediately press a mini peanut butter cup into each ball. Ta da!


Ok, remove carefully... hmm... how am I going to get these out of there... AHA! I've got it! I'll use my pie server, that will be perfect...

Using the tip, I eased these beauties out of the cute little pan, with no issues. My mouth was watering, check em out!


I can't stand it! I've got to see inside... let's cut one in half!!!

YUMMY!!! Now, I mentioned changing an ingredient... after I read the recipe, I had an idea. What if I stuck another kind of candy in the center... like a rolo???


Ok, now I gotta see what these look on the inside...

OH WOW! And I think these might even taste better, if it is possible. I love reese cups. They are my favorite candy! Peanut butter and chocolate is my favorite combo of all time... but those peanut butter cookies wrapped around a melty, chocolatey, carmely center are irresistible!!! You know you want to try these... how could you not???
Peppermint Patty Poke Cake
Happy Fall! I've changed the background of my blog in honor of today, the first official day of fall. I love fall! Pumpkins, apples, cooler weather, Halloween, Thanksgiving, football... unfortunately, due to a lack of creative planning on my part, my recipe today is not fall related. It is part 2 in my "Baking with Candy" series though. I'm a bit behind on posting, I guess I've been in a baking slump the past few days. Well, it has come to an end! A post early this morning and at least one more later in the day. Well, that is the goal anyway.
I recently came across this recipe in a Betty Crocker mini cookbook I have had for a couple of years. As I flipped through the pages, this one really caught my eye. I've made poke cakes before, but never this intense! Chocolaty, minty, York Peppermint Patty yumminess... all mixed into a chocolate cake... how could you go wrong?


I recently came across this recipe in a Betty Crocker mini cookbook I have had for a couple of years. As I flipped through the pages, this one really caught my eye. I've made poke cakes before, but never this intense! Chocolaty, minty, York Peppermint Patty yumminess... all mixed into a chocolate cake... how could you go wrong?

Ingredients:
CAKE:
1 box Betty Crocker Supermoist triple chocolate fudge cake mix (I used Pillsbury Devil's Food because I had it on hand)
water, vegetable oil, and eggs called for in cake mix directions
FILLING:
1 box (4 servings) white chocolate instant pudding
2 cups milk
1/2 t peppermint extract
FROSTING:
1/4 t peppermint extract
1 tub whipped chocolate frosting
3/4 cup coarsely chopped peppermint patties (8 candies)
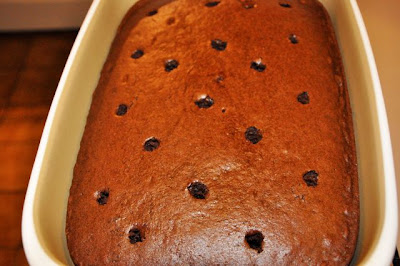
Prepare the cake mix as directed in a 9x13 pan. After you remove the cake from the oven, let it cool for 15 minutes. Poke top of warm cake every 1/2 inch with handle of wooden spoon.

In medium bowl, beat filling ingredients with a whisk.

Pour filling over the cake immediately.

Cover loosely and refrigerate for two hours. Stir the peppermint extract into the frosting.

You are probably wondering why the back of the label of my icing is ripped. Well, that is because I save boxtops for my nephew, Gavin. Sort of obsessively collect them, lol. So I cut it off before I used the icing. Thus, it is all wonky. Spread the icing over the cake. Roughly chop the peppermint patties and sprinkle on top of the iced cake.

NOW, you can finally cut the cake and enjoy it! Store the remaining cake in the fridge. Here is what the finished cake looked like...

With the strong scent of mint in the air (mingled with a hint of chocolate), I was beginning to be afraid that it may be too minty. I didn't want it to taste medicinally minty! Well, only one way to find out. Here is what the first slice looked like...

Perhaps you need a closer look....

It was SO moist! It has been my experience that sometimes chocolate cake can get dry, because of the cooking time it takes to get it done, but this was not dry at all! It was perfectly moist, supremely chocolate and just a hint of minty-ness. I thought it was really yummy. My prince however, is not a fan of chocolate and mint together. I know, I know... a shocking, strange opinion of his. So I knew he wasn't going to want to try this cake. So, my loyal friend, Dayna, was kind enough to taste test it with me. Oh, what sacrifices we make for friendship! :) Anyway, she liked it too. We were both a little shocked at how well it all came together. Like I said, the minty-ness was a bit daunting and scary at first. Don't be afraid though. It was easy and tastes really fancy. Give it a whirl and let me know what you think!
Thursday, September 16, 2010
From The Candy Jar To The Cookie Jar

It's been a few days since my last post. Okay, okay... it's been a week. I did use my time away from posting to plan new upcoming posts. Including three new upcoming series of themed posts! The first one is... "Baking From The Candy Jar" There just might be some hints of what is to come in this series in the cleverly crafted photo above. First up... M&M cookies!
M&M cookies are probably my third favorite cookie. I've loved them since I was a kid. I've been looking for the perfect recipe from my childhood since my late teens. I could never seem to find it. The recipe I was looking for was NOT merely a chocolate chip cookie recipe that switched the chocolate chips for M&Ms. While reading some recipes online last week, I finally came across the one I've been looking for! It was titled, "Oldie But Goodie M&M Cookie Recipe." I couldn't wait to try it! So let's get started....

Ingredients:
As you may have noticed (or maybe not) from the picture, I made a couple of changes to the ingredients. I used half a cup of shortening (butter flavored) and half a cup of butter. My Meemaw taught me this trick when I first started baking when I was little. It makes cookies turn out better. I never questioned it (Meemaw said so!), but have learned through trial and error that she is correct. Also, instead of using 1 1/2 cups of M&Ms, I used the whole bag. You can never have too much chocolate. (The Princess says so!)
Ok, I know what you are thinking (if you are anything like me). Princess, these ingredients are VERY similar to chocolate chip cookie ingredients. And you are correct, but the measurements are a bit different, and besides the recipe is called an oldie but goodie... so we are pressing forward and hoping to not be disappointed. Don't doubt The Princess! :-p
Preheat your oven to 350 and in a large bowl mix sugars, eggs and vanilla thoroughly.

Yep, they are all in there. Some of them are hiding but if you look hard enough, you can see all of the above mentioned ingredients. In a separate bowl whisk together flour, salt and baking soda. Add the flour mixture to creamed mixture gradually, blending well...

Now the fun part... add the M&Ms! The recipe said to add 3/4 cup to the mixture and then has you push a few into each cookie as you drop it on the cookie sheet. But I say, no way! Come on, being surprised at how many (or how few, as the case may be) M&Ms you get in your cookie is half the fun of eating them! Why ruin the surprise. I say dump them all in at once...

It is trickier than you think to capture this moment, while pouring M&Ms and shooting the camera yourself... just saying. :) Mix them into the batter, I went old school at this point and mixed them in by hand. I still do the same thing with chocolate chips... does anyone mix them in with the mixer? I just always switched back in the day, you know, pre-kitchenaid, so I still do it that way. Hmmm.... now I'm curious, it never crossed my mind to try it in the mixer, hmmm... maybe next time. Anyway, here is the dough all mixed up and finished...

Drop dough by teaspoonful onto a cookie sheet. Bake for 9 to 11 minutes, to your liking. (The recipe actually said that.) Here is another baking tip that I learned from Meemaw... while your first batch is in the oven, get the next batch ready to go in the oven on another cookie sheet! It cuts your baking time in half. As the first batch comes out of the oven, put the waiting one in, move the first batch to the cooling rack and get the third batch ready to go in on the cookie sheet you just emptied. Repeat until your batter is all gone. I got 40 cookies out of this recipe.
I couldn't wait to taste these! I was so hoping that they were the recipe I remembered from my childhood. (Yes, I was way confident at the beginning of this post. Don't worry I tasted them before I started this post, so I have reason to be confident. But you are skipping ahead, be patient! :-P)


Doesn't it look temptingly delicious? I can't wait anymore! I have to try it! They look right. They smell right. Could it be? I finally found the recipe after all these years???

I did! This is THE one! They are so yummy. Simple, sweet, buttery, chocolatey... yummy! You need to try these. They are super simple and will take you back to your childhood... or at least to my childhood. Enjoy!
Thursday, September 9, 2010
Vanilla Buttermilk Pound Cakes
Several weeks ago I bought a Cooking Light magazine called "Quick Baking." It intrigued me because it was a Cooking Light magazine with healthier baking recipes. It is full of all kinds of yummy things that I can't wait to try. I just happened to have the ingredients for this one on hand, so it is where I started....


Ingredients:
3 cups all-purpose flour
1 teaspoon baking powder
1/2 teaspoon baking soda
1/2 teaspoon salt
2 cups sugar
3/4 cup butter, softened
1 teaspoon vanilla extract
3 large eggs
1 1/3 cups low-fat buttermilk
Cooking spray
Preheat oven to 350°. Combine flour and next 3 ingredients (through salt); stir with a whisk...

Place sugar, butter, and vanilla in a large bowl...

beat with a mixer at medium speed until light and fluffy...

Add eggs, 1 at a time...

beating well after each addition....

Add flour mixture and buttermilk to sugar mixture, beginning and ending with flour mixture.


The finished batter is super fluffy, creamy and vanillay! I used Haitian vanilla my aunt brought me from her mission trip there. It's really strong and I swear has a hint of cinnamon and coconut to it. Regardless, it makes any dish I use it in a tad more yummy! It was tempting to just grab a spoon and eat the batter raw... it smelled and looked that good....

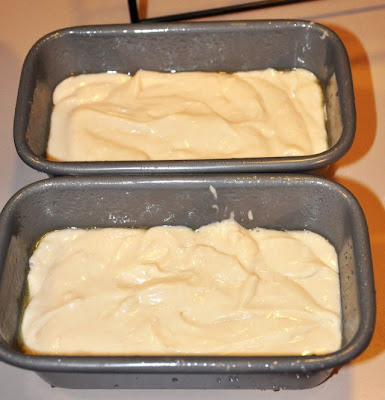
Spoon batter into pans coated with cooking spray. It had very specific instructions about the pans you should use. I, of course, ignored those specs and chose the ones I wanted to use. That is how the Princess rolls! I used a mini bundt pan that had six wells in it and I still had batter left over, so I slammed it in two mini loaf pans.


They look way bigger in these pics than they are because I didn't use anything as a point of reference. But trust me, they are mini loaf pans. Bake at 350° for 40 minutes or until a wooden pick inserted in the center comes out clean. Cool in pans 10 minutes on a wire rack. Remove from pans. Cool completely on a wire rack. And viola, Vanilla Buttermilk Pound Cakes!


I think I may have let mine go just a tad too long, they got a little too golden brown. But they are still delicious!


Here is the original recipe. If you use the pans that they specify, they also give you the nutritional info on them. To me, this is much lighter than a pound cake. It doesn't just sink to the bottom of your stomach like a rock after you swallow it. It's super fluffy and light. Because I used that Haitian vanilla, mine taste like they have a hint of cinnamon and coconut in them somehow. These turned out much better than I expected. They were really simple and they taste much better than they look! Enjoy!
Subscribe to:
Comments (Atom)


